Image relevance check
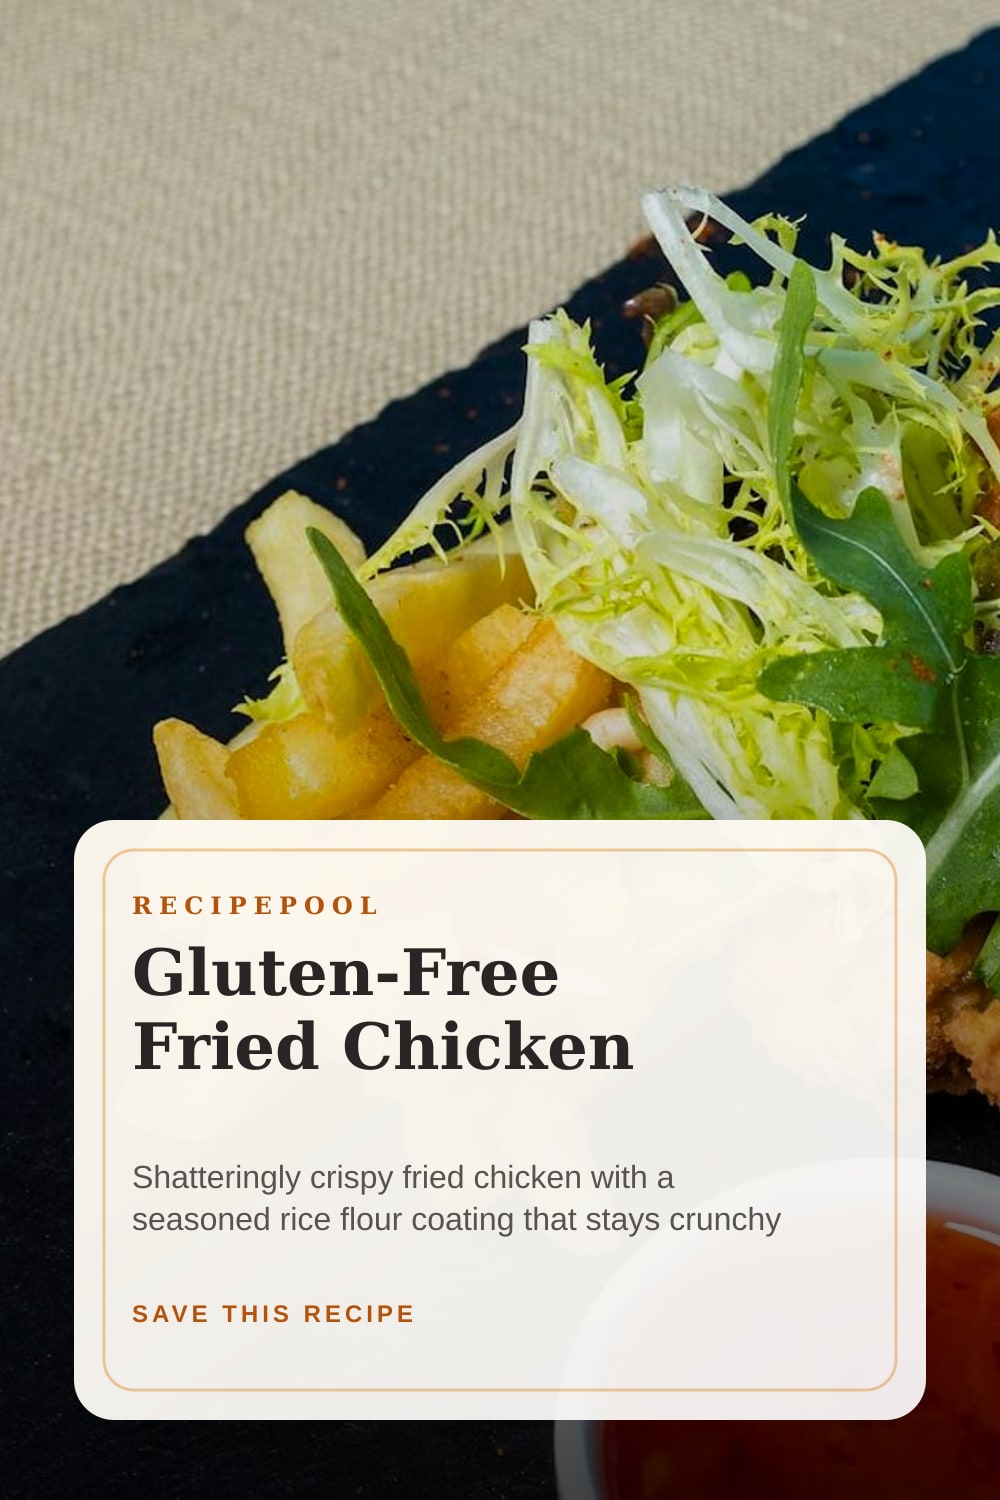
The hero image is reviewed against the dish title and alt text: Crispy fried chicken pieces with dipping sauce, fries, and a small salad on a black plate. The page also includes 3 visual checkpoints.
Prep Time
20 min
Cook Time
25 min
Total Time
45 min
Servings
4
8 pieces
Difficulty
Medium
Cost
Budget
$
Crispy, crunchy coating with rice flour and spices
Shatteringly crispy fried chicken with a seasoned rice flour coating that stays crunchy for hours. All the crunch and juiciness of classic fried chicken, completely gluten-free.
20m
Prep Time
25m
Cook Time
45m
Total Time
4
Servings
Medium
Difficulty
Budget $
Cost
Recipe by Marcus Whittaker
Reviewed by RecipePool Weeknight Dinner Desk
Editorially reviewed for image relevance, instruction clarity, ingredient fit, visual checkpoints, and practical home-cooking usefulness.
//
Rice flour creates an even crispier coating than wheat flour because it has a finer texture and contains more starch. A buttermilk brine ensures the meat is juicy and flavorful inside.
Recipe-specific review checks
Last reviewed May 20, 2026 by RecipePool Weeknight Dinner Desk. The checks below are tied to this recipe's image, cooking method, and reader support sections.
The hero image is reviewed against the dish title and alt text: Crispy fried chicken pieces with dipping sauce, fries, and a small salad on a black plate. The page also includes 3 visual checkpoints.
The instructions are supported by stovetop cues for a main course result, including timing, doneness, troubleshooting, and scaling guidance.
This page includes 2 tips, 2 recipe FAQs, and an editor note: Read through Gluten-Free Fried Chicken once before you start.
Kitchen intelligence
Before you start
Start by having rice flour, bone-in chicken pieces (thighs, drumsticks), and cornstarch ready, then marinate chicken in buttermilk with salt for at least 1 hour (overnight is best).
Timing read
Plan for 20 minutes prep and 25 minutes cooking. Midway check: Remove chicken from buttermilk, dredge in flour, dip back in buttermilk, then dredge again.
Flavor logic
rice flour, bone-in chicken pieces (thighs, drumsticks), cornstarch, and buttermilk carry the main flavor and texture, so measure them before you adjust seasoning or heat.
Serving plan
For Main Course, the finish should match this final cue: Drain on a wire rack and season with a sprinkle of salt immediately.
Visual checkpoints

Gluten-Free Fried Chicken should look close to this before serving: clear color contrast, distinct texture, and a ready-to-eat finish.
Have 8 bone-in chicken pieces (thighs, drumsticks), 1 cup rice flour, 1/4 cup cornstarch measured and ready before heat goes on. Marinate chicken in buttermilk with salt for at least 1 hour (overnight is best).
Drain on a wire rack and season with a sprinkle of salt immediately.
Ingredient notes
Shopping focus
Rice flour, bone-in chicken pieces (thighs, cornstarch, and buttermilk carry most of the flavor. Spend attention there first.
Prep notes
Set up the ingredients in list order and keep time-sensitive items nearby.
Adjustment logic
If needed, use Tapioca flour in place of Rice flour. Even crunchier but less flavorful
Optional items
Keep the main items intact; use garnish, heat, or acidity for small adjustments.
Shopping guide
Buy first
Bone-in chicken pieces (thighs is the ingredient most likely to affect freshness and texture.
Package check
Rice flour, cornstarch, and buttermilk may come in larger containers than needed; confirm amounts before buying backups.
Cost control
Use store brands, pantry staples, or simpler sides before changing the core ingredients.
Storage planning
Refrigerate for up to 3 days.
Useful Kitchen Picks
These are optional, recipe-relevant searches for tools or pantry staples that can make this specific recipe easier to repeat.
Helpful Pick
Thermometer
Useful tool
This is the kind of recipe where doneness changes the result fast. A quick thermometer helps you pull it at the right moment instead of guessing.
The easiest upgrade here is accuracy, not another pan.
If you cook meat or fish regularly, an instant-read thermometer gets used constantly.
Shop thermometer options for this recipeHelpful Pick
Olive Oil
Pantry upgrade
A clean everyday olive oil is useful for browning, roasting, and finishing without adding harsh flavor. It is one of the safest pantry upgrades for savory cooking.
This is a reusable staple, not a single-use ingredient.
A good everyday olive oil earns its space because it shows up in so many recipes.
Shop olive oil for this recipeAs an Amazon Associate I earn from qualifying purchases. Product links are included when they are directly relevant to the recipe.
Marinate chicken in buttermilk with salt for at least 1 hour (overnight is best).
Mix rice flour, cornstarch, paprika, garlic powder, onion powder, salt, and pepper in a shallow dish.
Remove chicken from buttermilk, dredge in flour, dip back in buttermilk, then dredge again.
Heat 2 inches of oil in a Dutch oven to 350°F. Fry chicken in batches, 6-7 minutes per side until golden and cooked to 165°F.
Drain on a wire rack and season with a sprinkle of salt immediately.
Technique notes
Key method moments pulled from the written steps.
Prep phase
3 steps
Mix rice flour, cornstarch, paprika, garlic powder, onion powder, salt, and pepper in a shallow dish.
Final seasoning should happen after the main ingredients have cooked together, when the balance is easiest to judge.
Move on after this instruction is complete: mix rice flour, cornstarch, paprika, garlic powder, onion powder, salt, and pepper in a shallow dish.
Finish phase
2 steps
Drain on a wire rack and season with a sprinkle of salt immediately.
Final seasoning should happen after the main ingredients have cooked together, when the balance is easiest to judge.
Move on after this instruction is complete: drain on a wire rack and season with a sprinkle of salt immediately.
Doneness cues
Look for
Drain on a wire rack and season with a sprinkle of salt immediately.
Heat cue
If the surface is changing too fast before the center or sauce is ready, lower the heat and give the recipe time to catch up.
Timing cue
Use the 20 minutes prep window to get organized so the cooking stage can move without rushed substitutions.
Final adjustment
Read through Gluten-Free Fried Chicken once before you start.
Troubleshooting
Texture check
Check this step before adding heat or liquid: Remove chicken from buttermilk, dredge in flour, dip back in buttermilk, then dredge again.
Timing check
Gluten-Free Fried Chicken starts with about 20 minutes prep. Watch texture and seasoning at the midpoint.
Seasoning check
Before changing seasoning, check this tip: Use a thermometer to maintain oil at 350°F—too hot burns the coating, too cool makes it greasy.
Leftover check
Reheat on a wire rack in a 400°F oven for 12-15 minutes for crispy results.
Scaling guide
Half batch
For Gluten-Free Fried Chicken, halve the main ingredients evenly and season lightly until the final taste check.
Double batch
For Gluten-Free Fried Chicken, use a wider pan, larger pot, or second tray so the short ingredient list has room.
Timing changes
Cook time starts around 25 minutes; prep starts around 20 minutes.
Leftover math
Refrigerate for up to 3 days.
Make-ahead timeline
Earlier in the day
Start with this setup step: Marinate chicken in buttermilk with salt for at least 1 hour (overnight is best).
Before serving
Plan around 20 minutes of prep and 25 minutes of cooking so the final step lands near serving time.
Leftover plan
Refrigerate for up to 3 days.
Reheat without damage
Reheat on a wire rack in a 400°F oven for 12-15 minutes for crispy results.
Serve with a fresh side salad for a balanced meal
Pair with your favorite grain or bread on the side
Garnish with fresh herbs for a beautiful presentation
Meal fit
Meal role
Pair this main course with sides that add contrast: crisp, fresh, acidic, or starchy as needed.
Best timing
Moderately involved timing for Gluten-Free Fried Chicken. Add a small buffer if serving guests.
Diet fit
Keep the sides aligned with gluten-free: vegetables, grains, sauces, or garnishes should follow the same constraint.
Occasion fit
Good for weeknight dinner and game day when sides can be handled while the main recipe cooks.
Even crunchier but less flavorful
Dairy-free alternative that works similarly
Use a thermometer to maintain oil at 350°F—too hot burns the coating, too cool makes it greasy.
Drain on a wire rack, not paper towels, to keep the bottom from getting soggy.
Refrigerate for up to 3 days.
Reheat on a wire rack in a 400°F oven for 12-15 minutes for crispy results.
Read through Gluten-Free Fried Chicken once before you start. The method timing is a guide—texture and seasoning matter more than the clock.
Per serving (110mg) · 4 servings
A moderate-calorie serving · based on a 2,000 cal daily diet
Nutritional values are approximate and may vary based on specific ingredients and preparation methods.
Tell us what was unclear, what you changed, or what needs another look in Gluten-Free Fried Chicken.
Keep Browsing
Follow the ingredients, cooking style, or curated collections that connect naturally to Gluten-Free Fried Chicken.
Gluten-Free Fried Chicken is kept in the public catalog after review for image relevance, ingredient fit, instruction clarity, and practical page quality.