Image relevance check
The hero image is reviewed against the dish title and alt text: Stack of thick chocolate chip cookies with melted chocolate pools and flaky sea salt on top. The page also includes 3 visual checkpoints.
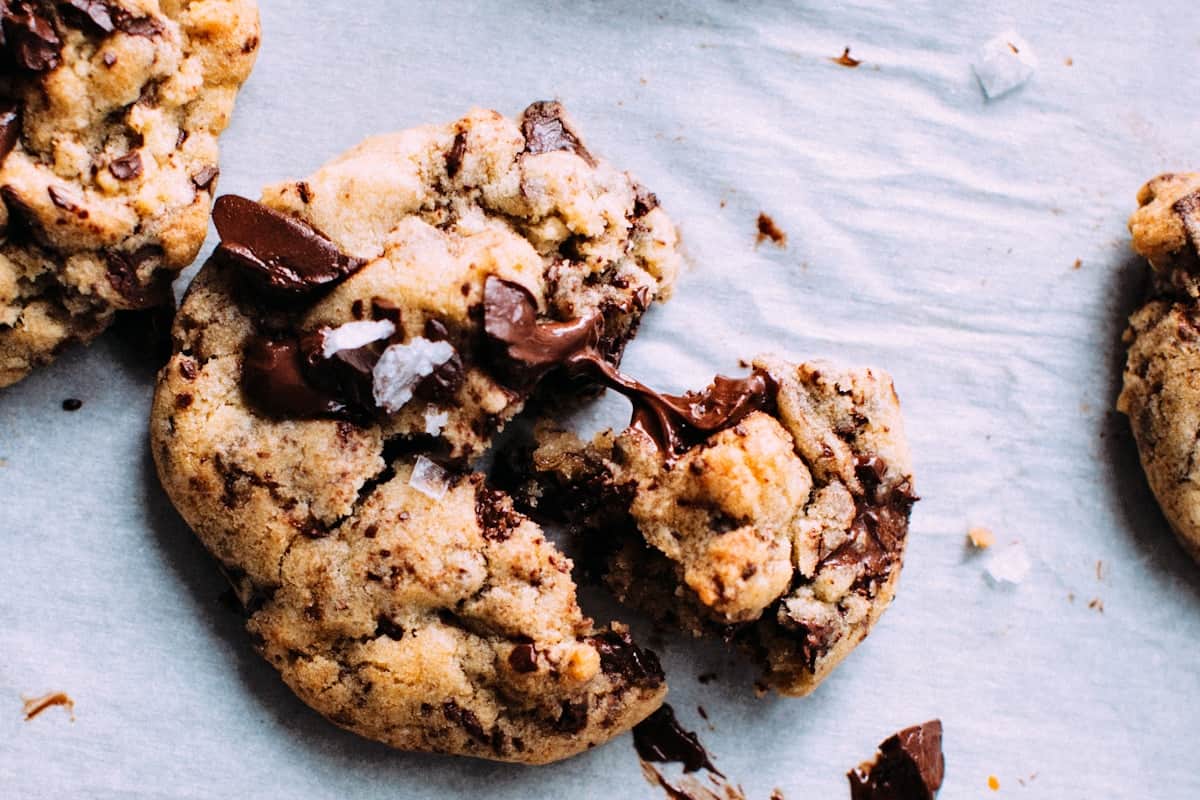
Crispy edges, chewy centers, puddles of chocolate
Photo: RecipePool
SavePrep Time
20 min
Cook Time
12 min
Total Time
32 min
Servings
24
24 cookies
Difficulty
Easy
Cost
Budget
$
Crispy edges, chewy centers, puddles of chocolate
Thick, chewy chocolate chip cookies with golden edges, soft centers, and generous pools of melted chocolate in every bite.
20m
Prep Time
12m
Cook Time
32m
Total Time
24
Servings
Easy
Difficulty
Budget $
Cost
Recipe by Mei Tanaka
Reviewed by RecipePool Baking & Breakfast Desk
Editorially reviewed for image relevance, instruction clarity, ingredient fit, visual checkpoints, and practical home-cooking usefulness.
//
The perfect chocolate chip cookie is a deeply personal thing, but most people agree on the essentials: crispy around the edges, chewy and slightly underdone in the center, with pockets of melted chocolate that stretch as you pull the cookie apart. This recipe delivers exactly that, and the secret is simpler than you might think — browned butter and a long chill.
Browning the butter adds a nutty, caramel-like depth that elevates these cookies from good to extraordinary. The extended chill (at least 24 hours if you can manage the patience) allows the flour to fully hydrate and the flavors to meld, producing a more complex cookie with better texture. It also concentrates the dough, so the cookies spread less and stay thick.
This recipe makes a generous batch of 24 cookies — enough to satisfy a crowd, fill a cookie jar, or stash in the freezer for emergency cookie cravings. Use the best chocolate you can find. Chopped bars are preferable to chips because they melt into those gorgeous irregular pools and shards that make a bakery-style cookie special.
Recipe-specific review checks
Last reviewed Apr 26, 2026 by RecipePool Baking & Breakfast Desk. The checks below are tied to this recipe's image, cooking method, and reader support sections.
The hero image is reviewed against the dish title and alt text: Stack of thick chocolate chip cookies with melted chocolate pools and flaky sea salt on top. The page also includes 3 visual checkpoints.
The instructions are supported by oven and baking cues for a dessert and snack result, including timing, doneness, troubleshooting, and scaling guidance.
This page includes 5 tips, 4 recipe FAQs, and an editor note: For Perfect Chocolate Chip Cookies, use the visual cues in the method as much as the timer.
Kitchen intelligence
Before you start
Start by having high-quality dark chocolate (60-70%), roughly chopped, cups (280g) all-purpose flour, and baking soda ready, then brown the butter: melt the butter in a light-colored saucepan over medium heat, swirling occasionally.
Timing read
Plan for 20 minutes prep and 12 minutes cooking. Midway check: Brown the butter: melt the butter in a light-colored saucepan over medium heat, swirling occasionally.
Flavor logic
high-quality dark chocolate (60-70%), roughly chopped, cups (280g) all-purpose flour, baking soda, and fine sea salt, plus flaky salt for topping carry the main flavor and texture, so measure them before you adjust seasoning or heat.
Serving plan
For American and Dessert, the finish should match this final cue: Let the cookies cool on the baking sheet for 5 minutes before transferring to a wire rack.
Visual checkpoints

Perfect Chocolate Chip Cookies should look close to this before serving: distinct textures, clear color contrast, and a ready-to-eat finish.
Have 2 1/4 cups (280g) all-purpose flour, 1 tsp baking soda, 1 tsp fine sea salt, plus flaky salt for topping measured and ready before heat goes on. Brown the butter: melt the butter in a light-colored saucepan over medium heat, swirling occasionally.
Let the cookies cool on the baking sheet for 5 minutes before transferring to a wire rack.
Ingredient notes
Shopping focus
High-quality dark chocolate (60-70%), cups (280g) all-purpose flour, baking soda, and fine sea salt carry most of the flavor. Spend attention there first.
Prep notes
Set up the ingredients in list order and keep time-sensitive items nearby.
Adjustment logic
If needed, use Milk chocolate or white chocolate in place of Dark chocolate. Milk chocolate will be sweeter; consider reducing the sugar slightly
Optional items
Keep the main items intact; use garnish, heat, or acidity for small adjustments.
Shopping guide
Buy first
Egg plus 1 egg yolk is the ingredient most likely to affect freshness and texture.
Package check
Cups (280g) all-purpose flour, (2 sticks) unsalted butter, and packed dark brown sugar may come in larger containers than needed; confirm amounts before buying backups.
Cost control
Use store brands, pantry staples, or simpler sides before changing the core ingredients.
Storage planning
Store baked cookies in an airtight container at room temperature for up to 5 days.
Useful Kitchen Picks
These are optional, recipe-relevant searches for tools or pantry staples that can make this specific recipe easier to repeat.
Helpful Pick
Sheet Pan
Useful tool
The pan is doing more work here than it looks like. A sturdy, evenly heating sheet pan gives you better browning and fewer hot spots.
This recipe benefits from more even oven contact and easier cleanup.
A heavy rimmed sheet pan is one of the highest-use tools in almost any kitchen.
Shop sheet pan options for this recipeHelpful Pick
Vanilla Extract
Pantry upgrade
For baking and desserts, vanilla is often carrying more aroma than people expect. A better bottle gives the whole recipe a cleaner finish.
This is a small pantry move that usually makes baked goods taste more complete.
Vanilla extract is one of the easiest pantry upgrades to keep using.
Shop vanilla extract for this recipeAs an Amazon Associate I earn from qualifying purchases. Product links are included when they are directly relevant to the recipe.
Brown the butter: melt the butter in a light-colored saucepan over medium heat, swirling occasionally. The butter will foam, then the milk solids will turn golden brown and smell nutty, about 5–7 minutes. Immediately pour into a heatproof bowl and let cool for 10 minutes.
Whisk together the flour, baking soda, and fine sea salt in a medium bowl. Set aside.
Add the brown sugar and granulated sugar to the browned butter and whisk vigorously for 1 minute. Whisk in the vanilla, then the whole egg and egg yolk, beating until the mixture is smooth and slightly thickened, about 30 seconds.
Fold the flour mixture into the wet ingredients with a spatula until just combined — a few streaks of flour are fine. Fold in the chopped chocolate.
Cover the bowl tightly with plastic wrap and refrigerate for at least 2 hours, or ideally 24–36 hours for the best flavor and texture.
When ready to bake, preheat the oven to 375°F (190°C) and line baking sheets with parchment paper.
Scoop rounded tablespoons of dough (about 2 oz each) onto the prepared sheets, spacing them 3 inches apart. Sprinkle each with a few flakes of sea salt.
Bake for 10–12 minutes, until the edges are golden but the centers still look slightly underdone. They will continue to set as they cool.
Let the cookies cool on the baking sheet for 5 minutes before transferring to a wire rack.
Technique notes
Key method moments pulled from the written steps.
Prep phase
3 steps
Brown the butter: melt the butter in a light-colored saucepan over medium heat, swirling occasionally.
This stage builds the browned, savory base that makes the finished dish taste deeper than the ingredient list alone.
Use 5–7 minutes as the window, then check color and texture before moving on.
Cook phase 1
3 steps
Cover the bowl tightly with plastic wrap and refrigerate for at least 2 hours, or ideally 24–36 hours for the best flavor and texture.
This rest gives seasoning time to move through the food instead of staying only on the surface.
Use 2–36 hours as the window, then check color and texture before moving on.
Finish phase
3 steps
Bake for 10–12 minutes, until the edges are golden but the centers still look slightly underdone.
The oven stage sets texture and color; check browning and tenderness because pan size and ingredient thickness can shift the finish.
Use 10–12 minutes as the window, then check color and texture before moving on.
Doneness cues
Look for
Let the cookies cool on the baking sheet for 5 minutes before transferring to a wire rack.
Heat cue
Use the written temperature as the anchor, then confirm by texture before serving Perfect Chocolate Chip Cookies.
Timing cue
The clearest timed instruction is: Brown the butter: melt the butter in a light-colored saucepan over medium heat, swirling occasionally.
Final adjustment
For Perfect Chocolate Chip Cookies, use the visual cues in the method as much as the timer.
Troubleshooting
Texture check
Check this step before adding heat or liquid: Brown the butter: melt the butter in a light-colored saucepan over medium heat, swirling occasionally.
Timing check
Perfect Chocolate Chip Cookies starts with about 20 minutes prep. Steady heat and small adjustments are usually enough.
Seasoning check
Before changing seasoning, check this tip: Use a light-colored pan to brown the butter so you can clearly see the milk solids change color.
Leftover check
Warm cookies in a 300°F oven for 3–4 minutes to restore the gooey center.
Scaling guide
Half batch
For Perfect Chocolate Chip Cookies, halve the main ingredients evenly and season lightly until the final taste check.
Double batch
For Perfect Chocolate Chip Cookies, use a wider pan, larger pot, or second tray so the moderate ingredient list has room.
Timing changes
Cook time starts around 12 minutes; prep starts around 20 minutes.
Leftover math
Store baked cookies in an airtight container at room temperature for up to 5 days.
Make-ahead timeline
Earlier in the day
Start with this setup step: Brown the butter: melt the butter in a light-colored saucepan over medium heat, swirling occasionally.
Before serving
Perfect Chocolate Chip Cookies moves quickly, so avoid starting until the table, sides, and serving pieces are close to ready.
Leftover plan
Store baked cookies in an airtight container at room temperature for up to 5 days.
Reheat without damage
Warm cookies in a 300°F oven for 3–4 minutes to restore the gooey center.
Serve with classic coleslaw and cornbread on the side
Pair with fresh-cut fries or roasted potato wedges
Serve with a scoop of vanilla ice cream or a dollop of whipped cream
Dust with powdered sugar or drizzle with chocolate sauce before serving
Meal fit
Meal role
Pair this dessert and snack with sides that add contrast: crisp, fresh, acidic, or starchy as needed.
Best timing
Low-friction timing for Perfect Chocolate Chip Cookies. Add a small buffer if serving guests.
Diet fit
Stay in the american lane with sides and condiments.
Occasion fit
Good for holiday and potluck when sides can be handled while the main recipe cooks.
Milk chocolate will be sweeter; consider reducing the sugar slightly
Light brown produces a slightly less chewy, less caramel-flavored cookie
Results will be slightly more crumbly but still delicious; Bob's Red Mill 1:1 works well
Use a light-colored pan to brown the butter so you can clearly see the milk solids change color. In a dark pan, it is too easy to burn.
Chopped chocolate bars are vastly superior to chocolate chips here. Chips are formulated to hold their shape, so they do not create those beautiful melty pools.
If you cannot wait 24 hours, chill the dough for at least 2 hours. Even that short rest makes a noticeable difference.
Freeze scooped dough balls on a sheet pan, then transfer to a freezer bag. Bake from frozen, adding 1–2 minutes to the bake time.
Under-bake rather than over-bake. The cookies will firm up significantly as they cool.
Store baked cookies in an airtight container at room temperature for up to 5 days. Unbaked dough balls can be frozen for up to 3 months.
Warm cookies in a 300°F oven for 3–4 minutes to restore the gooey center. Microwaving for 10 seconds also works in a pinch.
For Perfect Chocolate Chip Cookies, use the visual cues in the method as much as the timer. Cool completely before slicing or storing if you want clean pieces.
Per serving (1 cookie) · 24 servings
A light, low-calorie option · based on a 2,000 cal daily diet
Nutritional values are approximate and may vary based on specific ingredients and preparation methods.
Tell us what was unclear, what you changed, or what needs another look in Perfect Chocolate Chip Cookies.
Keep Browsing
Follow the ingredients, cooking style, or curated collections that connect naturally to Perfect Chocolate Chip Cookies.
Perfect Chocolate Chip Cookies is kept in the public catalog after review for image relevance, ingredient fit, instruction clarity, and practical page quality.
Photo: RecipePool